Orchids are renowned for their exquisite beauty, but even the most dedicated orchid enthusiasts can sometimes face a puzzling problem: the appearance of unsightly dark spots on orchid leaves. These spots can range from tiny specks to large, spreading blotches, and they often cause alarm for plant owners. Are they a sign of disease? Is your precious orchid doomed? Understanding the root cause of these discolorations is the first step toward effective treatment and prevention.
In this comprehensive guide, we’ll delve into the various reasons why your orchid might be developing dark spots, from common environmental stressors to more serious infections. We’ll equip you with the knowledge to identify different types of spots, understand their implications, and provide actionable advice on how to treat and prevent them. By the end, you’ll feel confident in diagnosing and caring for your orchid, ensuring it remains healthy and vibrant. Let’s uncover the secrets behind those mysterious dark spots on orchid leaves and restore your plant’s pristine elegance.
Understanding the Different Types of Dark Spots On Orchid Leaves
When you notice dark spots on orchid leaves, it’s natural to be concerned. However, not all spots are created equal. The appearance, location, and progression of these spots can offer crucial clues about what’s affecting your orchid. Recognizing these differences is key to proper diagnosis and treatment.
Dark spots can manifest in various shades, including black, brown, or even purplish hues. They might be small and isolated, or large and spreading. Some spots may feel mushy, while others are dry and sunken. Pay close attention to these details, as they will guide you in determining whether your orchid is suffering from a fungal infection, bacterial disease, environmental stress, or pest damage.
Fungal Infections: A Common Culprit
Fungal diseases are among the most frequent causes of black spots on orchid leaves and brown spots. They thrive in conditions of high humidity and poor air circulation, which are often present in indoor orchid environments. Early identification and treatment are crucial to prevent the spread of these infections.
Types, Symptoms, and Treatment:
- Black Rot (Phytophthora or Pythium):
- Symptoms: Starts as small, water-soaked lesions that quickly turn black and spread rapidly, often affecting the crown and pseudobulbs. Leaves become soft and mushy.
- Treatment: Immediately isolate the plant. Cut away all infected tissue with a sterile blade, ensuring you cut into healthy tissue. Apply a broad-spectrum fungicide to the remaining plant and repot in fresh, sterile medium. Improve air circulation.
- Anthracnose (Colletotrichum species):
- Symptoms: Circular or irregular sunken brown to black spots, often with yellow halos. These spots can merge and cause large areas of decay, particularly on older leaves.
- Treatment: Remove affected leaves. Apply a copper-based fungicide or a systemic fungicide. Ensure good air movement and avoid overhead watering.
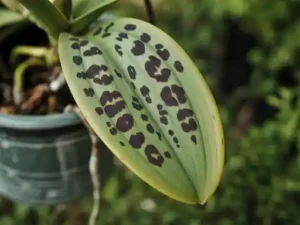
- Leaf Spot (Various fungi):
- Symptoms: Typically small, dark brown or black spots, sometimes slightly raised, that can appear anywhere on the leaf surface. They may be surrounded by a yellow ring.
- Treatment: Improve air circulation and reduce humidity. Remove severely infected leaves. Use a general orchid fungicide if the problem persists.
Bacterial Infections: Fast-Spreading Threats
Bacterial infections can be more aggressive than fungal ones and often require swift action. They also favor warm, humid conditions and are usually spread through water splash or contaminated tools. These can quickly lead to widespread orchid leaf discoloration if not addressed.
Types, Symptoms, and Treatment:
- Bacterial Brown Spot (Acidovorax avenae subsp. cattleyae):
- Symptoms: Starts as small, water-soaked spots that rapidly enlarge, turning brown or black. The spots often have a distinct yellow halo and can exude a foul-smelling liquid.
- Treatment: Isolate immediately. Remove infected tissue with a sterile blade, cutting well into healthy areas. Disinfect tools thoroughly. Apply a bactericide (like a copper-based product) or hydrogen peroxide solution to the affected areas. Avoid overhead watering.
- Bacterial Soft Rot (Erwinia species):
- Symptoms: Begins as small, soft, water-soaked spots that quickly spread, turning leaves into a mushy, foul-smelling mess. This is highly destructive and can kill an orchid quickly.
- Treatment: This is very difficult to treat once established. Remove all infected parts and apply a bactericide. Good hygiene and prevention are critical.
Environmental Stressors: When Nature Causes Spots
Sometimes, dark spots on orchid leaves aren’t caused by pathogens but by adverse environmental conditions. These are often easier to rectify once identified.
Sunburn: Too Much Light
- Identification: Irregular, bleached or yellow patches that eventually turn brown or black, feeling dry and papery. Often appears on the parts of the leaf most exposed to direct sun.
- Prevention: Move your orchid to a location with bright, indirect light. Avoid direct midday sun.
- Treatment: Trim off severely burned areas if they are unsightly or prone to secondary infections. The damaged tissue won’t recover, but the plant can continue to grow new, healthy leaves once moved.
Cold Damage: Chilling Effects
- Symptoms: Dark, water-soaked spots or patches that turn black, often affecting leaf tips or margins. The damaged tissue feels soft and mushy at first, then becomes dry and papery.
- Prevention: Keep orchids away from cold windows, drafts, or air conditioning vents. Most orchids prefer temperatures above 60°F (15°C).
- Treatment: Remove severely damaged leaves. Provide a warmer, stable environment.
Pest Infestations: Tiny Trouble Makers
While pests don’t typically cause large dark spots on orchid leaves directly, their feeding habits can lead to discoloration, pitting, or create entry points for secondary infections that manifest as dark spots.
Common Pests, Signs, and Solutions:
- Scale Insects & Mealybugs:
- Signs: Small, raised bumps (scale) or cottony masses (mealybugs) on leaves and stems. Their feeding can cause yellowing, stunted growth, and sticky honeydew, which can lead to sooty mold (black, powdery film).
- Solutions: Manually remove with a cotton swab dipped in rubbing alcohol. Use insecticidal soap or neem oil for persistent infestations.
- Spider Mites:
- Signs: Tiny dots, often appearing as stippling or bronzing on the underside of leaves. Severe infestations can cause webbing.
- Solutions: Increase humidity, rinse leaves regularly, use insecticidal soap or specific miticides.
Watering Issues and Nutrient Deficiencies
Improper watering practices and lack of essential nutrients can also contribute to orchid leaf spots and overall decline.
- Overwatering: Leads to root rot, which starves the plant of water and nutrients, causing leaves to yellow, soften, and sometimes develop dark, mushy spots as secondary infections set in. Ensure proper drainage and allow media to dry slightly between waterings.
- Underwatering: Causes leaves to shrivel, wrinkle, and sometimes develop dry, brown tips or patches due to dehydration.
- Nutrient Deficiencies: While less common for direct dark spots, deficiencies can weaken the plant, making it more susceptible to diseases. For example, a lack of magnesium can cause yellowing between veins, while potassium deficiency might lead to brown leaf margins. Use a balanced orchid fertilizer regularly.
General Prevention and Best Practices for Healthy Orchids
Preventing dark spots on orchid leaves is always easier than treating them. Adopting good cultural practices will significantly reduce the risk of most problems:
- Proper Watering: Water in the morning so leaves can dry before nightfall. Avoid getting water in the crown or leaf axils, especially for Phalaenopsis. Use appropriate, well-draining orchid potting mix.
- Good Air Circulation: Ensure adequate airflow around your orchids. A small fan can be beneficial in humid environments to prevent stagnant air, which encourages fungal and bacterial growth.
- Optimal Lighting: Provide bright, indirect light. Monitor for signs of sunburn or insufficient light (dark green, limp leaves).
- Appropriate Humidity: Most orchids prefer 50-70% humidity. Use a humidity tray or humidifier if your environment is too dry.
- Sterilization: Always sterilize pruning tools between cuts and between plants to prevent the spread of diseases. Use rubbing alcohol or a flame.
- Quarantine New Plants: Isolate any new orchid purchases for several weeks to ensure they are pest and disease-free before introducing them to your collection.
- Regular Inspection: Routinely inspect your orchids for any early signs of trouble, allowing for prompt intervention.
Recommended Products
Orchid Fungicide
Essential for treating fungal infections like black rot or anthracnose. Look for a broad-spectrum product safe for orchids.
Neem Oil for Plants
A natural, organic pesticide and fungicide effective against many common orchid pests and some fungal issues. Great for prevention and treatment.
Fast-Draining Orchid Potting Mix
Crucial for preventing root rot caused by overwatering. A good mix ensures proper aeration and drainage, critical for orchid health.
Balanced Orchid Fertilizer
Provides essential nutrients, strengthening your orchid’s natural defenses against diseases and environmental stress.
Frequently Asked Questions About Dark Spots On Orchid Leaves
Are all dark spots on orchid leaves dangerous?
Not necessarily. While some dark spots on orchid leaves indicate serious issues like fungal or bacterial infections, others can be benign, such as old sunburn scars that have healed, or simply the natural aging process of an older leaf. It’s crucial to observe the spot’s characteristics and the orchid’s overall health to determine the severity.
Can I just cut off the affected leaves?
In many cases, yes. For localized fungal or bacterial spots, removing the affected leaf or portion of the leaf with sterile tools can prevent the spread of the disease. Always cut into healthy tissue, and sterilize your tools before and after each cut. For sunburn, removing the damaged part is usually for aesthetic reasons, as the damage is irreversible.
How can I tell the difference between fungal and bacterial spots?
Fungal spots often appear as dry, sunken, or powdery lesions, sometimes with distinct rings or halos, and may spread slower. Bacterial spots, on the other hand, are typically water-soaked, soft, and mushy, often spreading very rapidly with a foul odor. Bacterial spots tend to exude liquid, which fungal spots usually do not.
What should I do immediately after noticing dark spots?
First, isolate the affected orchid from your other plants to prevent potential spread. Next, thoroughly examine the spots for their color, texture, size, and location. This will help you identify the likely cause. Based on your assessment, you can then decide on the appropriate treatment, whether it’s adjusting environmental conditions, applying a fungicide, or carefully pruning. Always ensure good air circulation and reduce humidity around the plant.
Will dark spots ever disappear on their own?
Once a leaf develops a dark spot due to damage (like sunburn) or an infection, that specific damaged tissue will not revert to its original healthy state. However, if the underlying cause is addressed, the spot may stop spreading, and the plant can continue to grow new, healthy leaves. The old, spotted leaves might eventually be shed by the plant.
Conclusion
Discovering dark spots on orchid leaves can be disheartening, but with the right knowledge and timely action, most issues are treatable. We’ve explored a range of causes, from common fungal and bacterial infections to environmental stressors like sunburn and cold damage, and even the subtle signs of pest infestations or nutrient deficiencies. The key takeaway is observation: by carefully examining the nature of the spots and your orchid’s overall health, you can accurately diagnose the problem and implement an effective solution.
Remember that prevention is always the best medicine. Maintaining optimal growing conditions—proper watering, good air circulation, appropriate light, and regular feeding—will significantly bolster your orchid’s resilience against many potential threats. Don’t let a few spots deter you; instead, see them as an opportunity to learn more about your orchid’s needs and become a more attentive and successful grower. With a little care and diligence, your beautiful orchids will continue to thrive and grace your home with their extraordinary blooms.